

Students and instructors alike benefit from consistent file management in online courses. Ensuring that students can readily locate and access the files they need serves to promote engagement and completion of course requirements. Similarly, consistent file management helps instructors to navigate through and update materials efficiently and to avoid introducing file-related errors. This post outlines recommendations and key considerations for optimizing file management within your online course. While recommendations and considerations related to Canvas-specific functionality are threaded throughout, you will also find broadly applicable tips pertinent to multiple learning management systems.
Developing a Course Folder Structure
A clear and consistent folder structure provides the foundation for effective file management in an online course. Depending on the standards for your program, your online course may already have a folder structure in place. If your course does not yet have a folder structure, addressing the following questions can help you determine the optimal setup:
- How many files do I currently have for my course? Do I anticipate significant changes in file counts prior to or during the term?
- What categories of files do I have for my course?
- How will these files be distributed throughout the course?
- Which files and file categories are for myself and/or other instructors? Which files and file categories are for students?
If you only have a few files, a simplistic structure consisting of one folder for student documents and one folder for instructor documents may suffice. If you have multiple files, it can be helpful to create additional subfolders within this structure. Within a student documents folder, for example, you might add subfolders for each course module (e.g., Module 1, Module 2) or file category (e.g., rubrics, assignment files, readings). You can take a similar approach to organize the instructor documents folder, using subfolders based on course sequence or file category (e.g., answer keys, sample assignment responses).
To set up your folder structure in Canvas, select "Files" in the left-hand navigation menu. From there, you can select “+ Folder” to add the folders you need. Next, you will want to be sure to set the desired access permissions for the folders to ensure that students can locate and retrieve all of the materials they need but can’t access files intended for instructor use only.
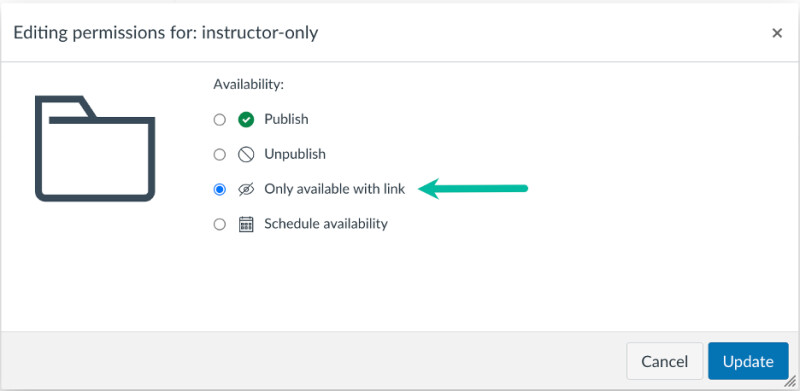
If you add a file to a folder with specific permissions in Canvas, those permissions are applied to the file. This simplifies the permissions setting process and streamlines file management. To set permissions for a folder, select the folder’s published or unpublished icon.

Then, you will see the available permissions options for the folder and can update them as needed. Folders marked as “Publish” will be readily accessible to students when they navigate to the Files area of Canvas. Changing the permissions to “Only available with link” as shown in the following screenshot restricts file access for students within the Files area of Canvas but still allows you to grant access to the specific files contained within the folder if they are linked on course pages. That is, students would not be able to see the instructor-only folder or its contents with the “Only available with link” permissions setting in place but would be able to see a file kept within that folder if you opted to link it within the course itself.
After adjusting the permissions for your course folders, it can be helpful to review the Files area in Student View if this option is available in your instance of Canvas. Student View allows you to check the Files area from a student's perspective and confirm that the correct folders are accessible. For further information on permissions options, see the Canvas guide for restricting files and folders.
Adding Course Files
Once you have established the preferred folder structure and folder permissions for your course, you can focus on populating the folders with the desired contents. We recommend always adding files directly to the folders you created in the Files area (rather than uploading them through the Rich Content Editor while building course pages) so that you can ensure they are properly organized and have the correct access permissions.
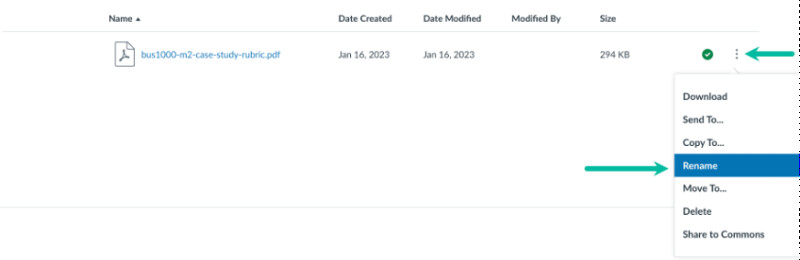
As you begin adding files, we also recommend establishing a naming convention. For example, you might name each file with the course code, module number, and a brief title (e.g., bus1000-m1-assignment-rubric). Applying a consistent naming convention will make it easier for both you and your students to identify and keep track of course files. If you wish to adjust the naming conventions for files after uploading them to Canvas, you can do so by navigating to the line item for the file, choosing the Options icon, and then selecting "Rename."
Replacing Course Files
Over time, course files may require modifications. To replace an existing file, complete the following steps:
- Outside of Canvas, prepare the updated version of the file with the same file name and file extension (e.g., .pdf, .docx, .xlsx) as the original.
- Upload the updated version of the file to the same course folder.
- Provided that the file name and file extension are identical, Canvas should prompt you to confirm whether you want to replace the existing version of the file.
- Once you have confirmed that you would like the existing version of the file to be replaced with the new version, any existing course links to that file should direct to the new version. This can be confirmed with a review of the applicable course pages.
If you opt to simply add a new version of a file to Canvas rather than replace an existing version, you will need to manually update any course links to that file. Additionally, you will want to be sure to remove the original version of the file from the course. Keeping multiple versions or duplicates of files in your course can cause confusion and potentially result in students accessing and relying on outdated or erroneous information.
Removing Course Files
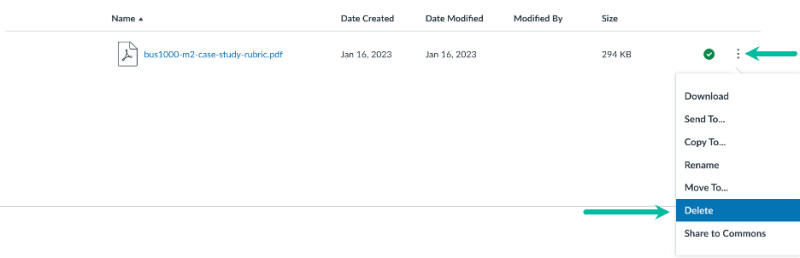
If you find that a course file is no longer needed, you can delete it from the course files. Before deleting the file, you may wish to download a copy to save outside of your course for potential future use. When you are ready to delete the file, you can do so by navigating to the line item for the file, choosing the Options icon, and then selecting "Delete."
Note that file deletion will break any remaining links to the file within the course. Accordingly, we recommend running the Canvas link validator after you’ve deleted a file to confirm if any link updates are necessary.
Conclusion
File management is an essential part of developing and facilitating online courses. Implementing a clear folder structure and carefully attending to permissions, organization, and versioning for your course files will help ensure that both you and your students are set up for success.